X2
よくある質問
デバイスの初期化
1. Device pairing is required to complete the subsequent distribution network, connection, and other operations when first activating the glasses;
2. Please install the APP on the mobile phone, and open the APP for pairing operation;
- - Install the apk. For Android, you need Android 10 or later.

You can refer to the following image to switch the system language.

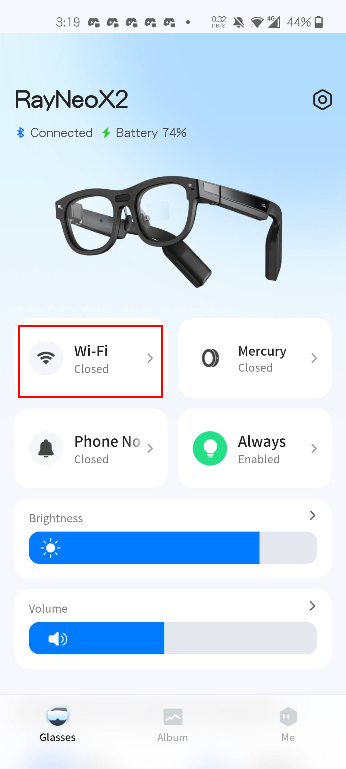
Currently, it is not possible to input text directly via glasses, so a mobile phone is required to connect to WiFi. After successfully pairing with the glasses, click on the WiFi module (as indicated in the red box in the diagram), select your network, and enter the password to connect.

スムーズなペアリングを確実に行うために、まずリングが完全に充電されていることを確認してください。
方法1: ショートカット
- メガネの電源をオンにした状態で、リングの「物理ボタン」をクリックしてペアリング モードに入ります。
- メガネに「ペアリング プロンプト ボックス」が表示されるまで (4 ~ 8 秒以内) 待ってから、クリックして確認します。
- ペアリングが成功すると、メガネに通知が表示されます。
方法2: 標準的な方法
「設定 -> デバイス管理 -> リングのペアリング」に移動し、「ペアリング」をクリックして、リングをオンにします。
アプリケーションガイド
メガネで撮影した写真やビデオは現在、モバイル アプリで表示できます。写真やビデオをアプリで取得するには、「アルバム」→「メガネ アルバム」→「転送モードに入る」→「接続済み」の順に進みます。

支援開発
【APKのインストール】
ADB 経由でスマート グラスを PC に接続することで、スマート グラスに APK をインストールできます。
ADBの使用方法については、https: //developer.android.com/tools/adbを参照してください。
The latest version of the system, 1.2.66 and above, has added restrictions on adb installation. You can first enable the permission with the following command:
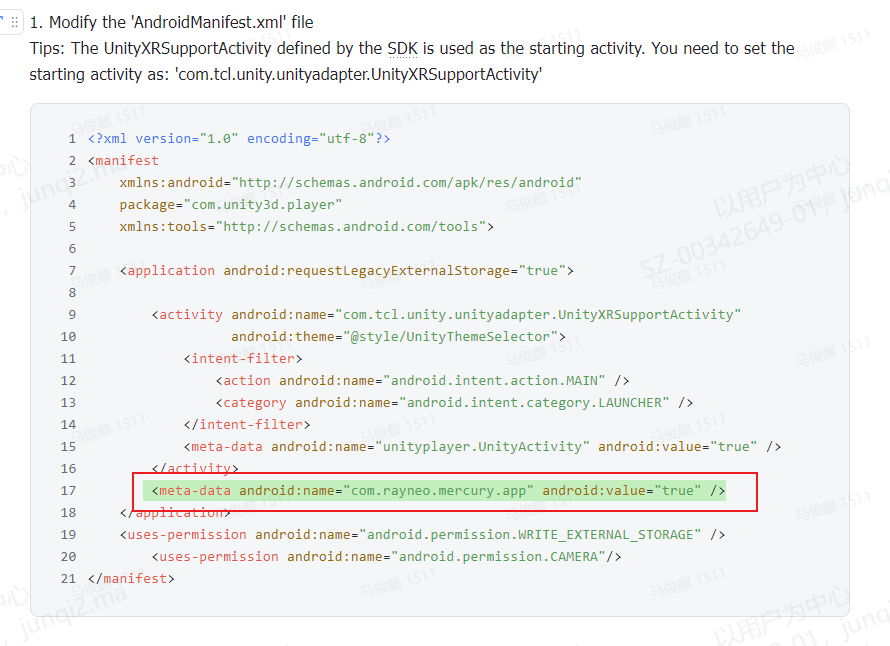
adb shell settings put global mercury_install_allowed 1After installing the third-party apk, you can find the corresponding entry in the "app center". If the entry is not found, you need to check whether the AndroidManifest.xml file has been configured correctly .

メガネはヘッドマウントデバイスであるため、開発者は開発プロセス中にコンピューター上でシミュレーションとデバッグを行う必要がある場合があります。画面投影には次のツールを使用することをお勧めします。
- scrcpy: 詳細な使用方法については、https: //github.com/Genymobile/scrcpyの公式ドキュメントを参照してください。
- anlink: 公式ウェブサイトhttps://cn.anlinksoft.com/からダウンロードできます。
その他の問題
シナリオ 1: 元の電話とのペアリングを復元する
図に示すように、自動接続が失敗した場合(下図参照)、次の手順を試してください。
- 携帯電話のシステム設定で Bluetooth モジュールに入り、「rayneo X2」を見つけてクリックして接続し、正常に接続できるかどうかを確認します。
- 最初の方法がまだ失敗する場合は、「再接続」ボタンを長押しして、電話アプリとメガネのペアリングを解除し、再接続してください。

Scenario Two: The Glasses Need to be Paired with Another Phone
- In this scenario, you first need to choose to re-pair at the glasses end. The path to this is: Settings -> Device Management -> Mobile Phone Settings ->Re-pairing.
- After unbinding the connection, the glasses can be re-paired with another mobile app."
Mercury アプリは Android 10 以上で実行する必要があります。Android のバージョンを確認してください。
システムの最新バージョン 1.2.66 以降では、adb のインストールに制限が追加されています。まず、次のコマンドで権限を有効にできます。
adb シェル設定にグローバル mercury_install_allowed 1 を設定します
メガネには 3 つのマイクが付いています。より良い録音品質が必要な場合は、必要に応じてマイクの 1 つを呼び出すことができます。Unity はネイティブ インターフェイス レイヤーを呼び出し、以下のパラメーターに従って設定できます。ps:デフォルト モードでは、メガネの前でマイクがアクティブになります。
| Set the status notification when each apk calls mic audioHAL; AudioManager.setparameter("audio_source=xxxx"); | ||
| audio record: | not configure yet | setParameters("audio_source_record=sound") |
| camera record: | call the 2 mics on the temple, all the sound is received, no noise reduction algorithm | setParameters("audio_source_record=camcorder") |
| translation: | Call 3 mics, do not receive the user's voice, but receive external voices | setParameters("audio_source_record=translation") |
| voice assistant: | Call the 2 mics on the temple, mainly receive the user's voice | setParameters("audio_source_record=voiceassistant") |
| To make sure each application has its own mic combination, please set "setParameters("audio_source_record=off" when exit. | ||
Using the camcorder mode, when channel=2, it calls two microphones; when channel=1, it calls the microphone above the nose rest.


以下は、マザーボードの過熱、システムのシャットダウン、および表示異常を回避するために必要なアプリ開発のチュートリアルです。
メガネが過熱する主な原因2つ
- 表示されるコンテンツ、特に電力を多く消費する白色コンテンツの割合を最小限に抑えます。
- 総電流 > 500mA
いくつかの提案
- メガネの合計電流を測定するための APK ツール (SDK ドキュメントを参照できます)
- メガネで実行する前にAPL推定値を表示する
- システムの明るさを20程度に下げます。
- システムの自動輝度制御(ALS)をオフにする


