X2
FAQ
Device initialization
1. Device pairing is required to complete the subsequent distribution network, connection, and other operations when first activating the glasses;
2. Please install the APP on the mobile phone, and open the APP for pairing operation;
- - Install the apk. For Android, you need Android 10 or later.

You can refer to the following image to switch the system language.

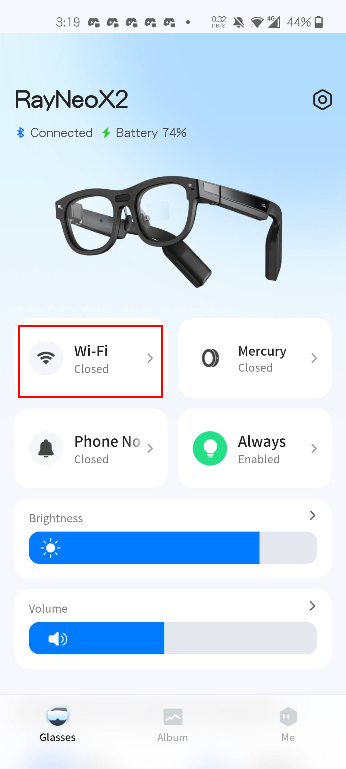
Currently, it is not possible to input text directly via glasses, so a mobile phone is required to connect to WiFi. After successfully pairing with the glasses, click on the WiFi module (as indicated in the red box in the diagram), select your network, and enter the password to connect.
To ensure a smooth pairing, please first ensure that the ring is fully charged.
Method 1: Shortcut
- With the glasses turned on, click the 'Physical Button' on the ring to enter pairing mode.
- Wait for the 'Pairing Prompt Box' to appear on the glasses (expected within 4-8 seconds), then click to confirm.
- Once pairing is successful, you will see a notification on the glasses.
Method 2: Standard Method
Go to 'Settings -> Device Management -> Ring Pairing', click on 'Pair', and then switch on the ring.
Application Guide
Photos and videos taken via the glasses can currently be viewed in the mobile app:Go to Album→Glasses Album→Enter Transfer Mode→Connected to get the pictures and video on the app.

Assisted Development
【Installing APK】
You can install APK on your smart glasses by connecting them to your PC through ADB.
For instructions on using ADB, please refer to: https://developer.android.com/tools/adb
The latest version of the system, 1.2.66 and above, has added restrictions on adb installation. You can first enable the permission with the following command:
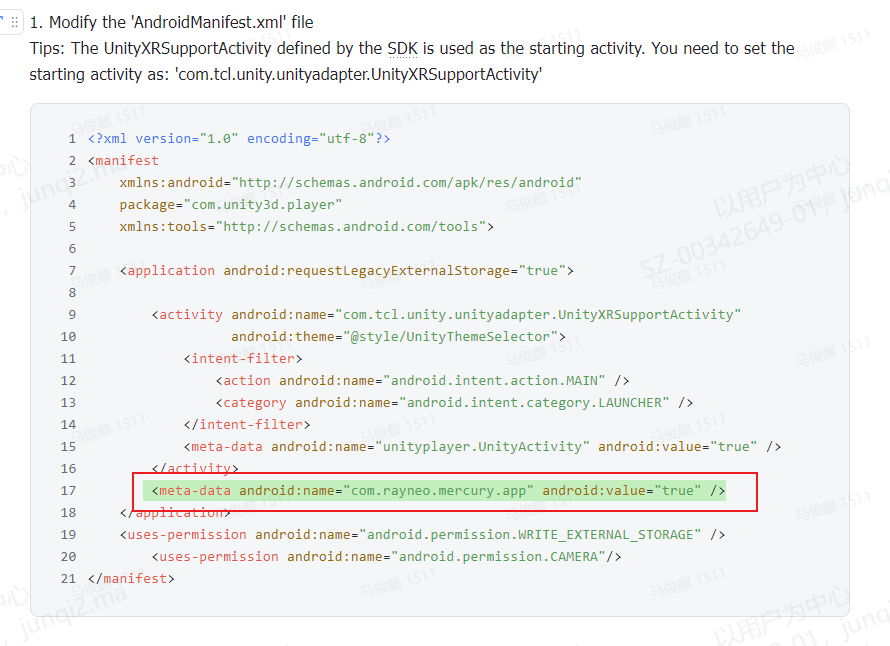
adb shell settings put global mercury_install_allowed 1After installing the third-party apk, you can find the corresponding entry in the "app center". If the entry is not found, you need to check whether the AndroidManifest.xml file has been configured correctly .
As glasses are head-mounted devices, developers may need to simulate and debug on the computer during the development process. It is recommended to use the following tools for screen projection:
- scrcpy: For detailed usage, please refer to the official documentation at https://github.com/Genymobile/scrcpy;
- anlink: Download available on the official website at https://cn.anlinksoft.com/
Other Issues
Scenario One: Restoring Pairing with the Original Phone
As shown in the figure, if automatic connection fails (as shown below), please try the following steps:
- Enter the Bluetooth module in the phone's system settings, find "rayneo X2", and click to connect to see if it can be connected successfully;
- If the first method still fails, you can long press the "reconnect" button, unpair the phone app from the glasses, and then reconnect.

Scenario Two: The Glasses Need to be Paired with Another Phone
- In this scenario, you first need to choose to re-pair at the glasses end. The path to this is: Settings -> Device Management -> Mobile Phone Settings ->Re-pairing.
- After unbinding the connection, the glasses can be re-paired with another mobile app."
Mercury App needs to run on Android 10 or above. Please check your Android version.
The latest version of the system, 1.2.66 and above, has added restrictions on adb installation. You can first enable the permission with the following command:
adb shell settings put global mercury_install_allowed 1
There are 3 microphones on the glasses. If you need better recording quality, you can choose to call one of the microphones according to your needs. Unity calls the native interface layer, and you can configure it according to the parameters below.ps:The default mode is to activate the microphone in front of the glasses.
| Set the status notification when each apk calls mic audioHAL; AudioManager.setparameter("audio_source=xxxx"); | ||
| audio record: | not configure yet | setParameters("audio_source_record=sound") |
| camera record: | call the 2 mics on the temple, all the sound is received, no noise reduction algorithm | setParameters("audio_source_record=camcorder") |
| translation: | Call 3 mics, do not receive the user's voice, but receive external voices | setParameters("audio_source_record=translation") |
| voice assistant: | Call the 2 mics on the temple, mainly receive the user's voice | setParameters("audio_source_record=voiceassistant") |
| To make sure each application has its own mic combination, please set "setParameters("audio_source_record=off" when exit. | ||
Using the camcorder mode, when channel=2, it calls two microphones; when channel=1, it calls the microphone above the nose rest.


Below tutorial for app development that is needed to avoid mainboard overheat, system shutdown, and display abnormal:
2 Main issues lead glasses to overheat
- Minimize the proportion of displayed content, especially white content that consumes more power.
- Total current > 500mA
A few suggestions
- Apk tool to measure total current on glasses (you can refer to sdk doc)
- Display APL estimation before running on glasses
- Reduce the system's brightness to around 20.
- Turn off the auto-brightness control (ALS) in the system